21 min to read
Flutter - NASA Astronomical Picture of the Day .
We will build a basic app to understand how to make an API call , handle Futures and use the knowledge to get a beautiful NASA Astronomical picture of the day .
Introduction
Flutter , since its first release in May , 2017 , has gained enormous popularity , thanks to its strong documentation, helpful community and the efficient and beautiful apps that we can build with it . With flutter we can build awesome apps easily from scratch . In this tutorial , we are going to build a simple app that displays a NASA Astronomical Picture of the day and the information about the picture . To accomplish this , we are going to use NASA APOD API . I am assuming that you have already installed flutter SDK and Android Studio / VS Code / X Code and know how to build and run a basic flutter app . If you don’t know ,what is an API , JSON , what are Futures and how to handle them in Flutter , please refer to the end of the tutorial , I have explained them briefly under ”Understand Basics” .
(If you want to jump straight to coding without going through complete tutorial , then please visit nasa_apod github repository and please give it a star if you liked the tutorial/project. Thanks. )
Let’s build the project .
NASA APOD Flutter Project
Create a new flutter project in your favourite IDE and name it nasa_apod . Open main.dart file and clear all the code except the imports , main function and MyApp class . Edit your MyApp class and make it look like this :
import 'package:flutter/material.dart';
import 'package:http/http.dart';

void main() => runApp(MyApp());


class MyApp extends StatelessWidget {
  Widget build(BuildContext context) {
    return MaterialApp(

      title: "NASA APOD",
      theme: ThemeData(

          primarySwatch: Colors.blue,
          visualDensity: VisualDensity.adaptivePlatformDensity,

     ),

      home: ShowPic(),

    );
  }
}
Before going ahead , open your pubspec.yaml file and add this dependency :
dependencies:
  flutter:
    sdk: flutter
  http: ^0.12.1
Now run pub get .
Add these two import statements at the top of main.dart :
import 'dart:convert';
import 'package:http/http.dart';
Create a stateful class ShowPic , as you might know you will have to create a State class , ShowPicState . These two classes should look like this :
class ShowPic extends StatefulWidget {

  @override
  _ShowPicState createState()=> _ShowPicState();

}

class _ShowPicState extends State<ShowPic>{

@override
  Widget build(BuildContext context) {
// TODO: implement build
  throw UnimplementedError();
 }
}
_ShowPicState class will contain all the logic to get the data from the api and display on the screen . The data that we will get contain information like title , media_type , information , hd url for the image etc . We are going to store the data in four String variables .We also need String variables for year , month and day . Create these String variables:
 String imageUrl;
 String imageInfo="Image Information";
 String imageTitle="Image Title";
 String mediaType ="mediaType";
 String year;
 String month;
 String day;
It’s time to create the function that will call the api :
Future<Response> getApodResponse({String year ,String month , String day})
{
    String date=year+"-"+month+"-"+day;
    String url =Uri.encodeFull("https://api.nasa.gov/planetary/apod?date=$date&hd=true&api_key=DEMO_KEY");

    Future <Response> response = get(url);

    return response;


  }
The function is quite simple first concatenated year,month and day , so that date is in the right format ,YYYY-MM-DD . Second, we have encoded the url . It’s important because it ensures that the url is valid. The third line calls the get method with the url as an argument.The get method is used to get data from the server . The get method returns a Future
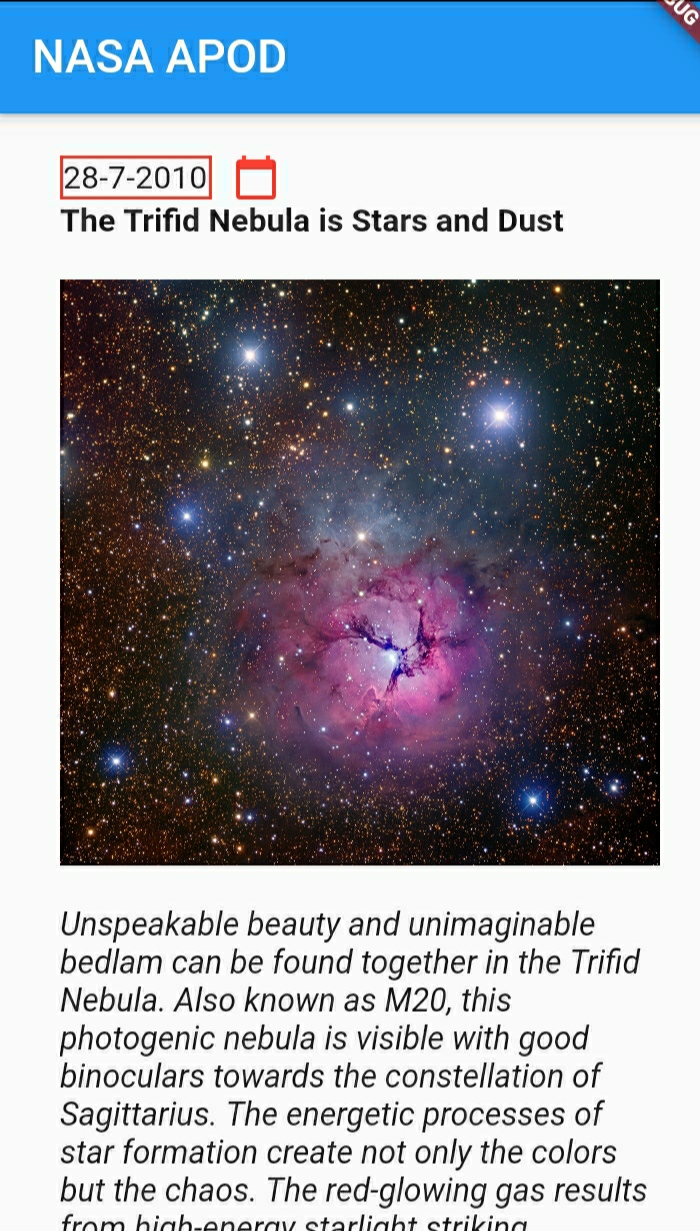
{"copyright":"Declan Deval","date":"2020-07-14","explanation":"Have you ever seen a comet? Tonight -- and likely the next few nights --
should be a good chance. Go outside just at sunset and look to your northwest.  The lower your horizon, the better.  Binoculars may help,
but if your sky is cloudless and dark, all you should need is your unaided eyes and patience. As the Sun sets, the sky will darken, and there
 will be an unusual faint streak pointing diagonally near the horizon. That is Comet NEOWISE. It is a 5-kilometer-wide evaporating dirty
iceberg visiting from -- and returning to -- the outer Solar System. As the Earth turns, the comet will soon set, so you might want to take a
 picture. In the featured image, Comet C/2020 F3 (NEOWISE) was captured two mornings ago rising over Stonehenge in the UK.  Discovered with the
 NASA satellite NEOWISE toward the end of March, Comet NEOWISE has surprised many by surviving its closest approach to the Sun, brightening
dramatically, and developing impressive (blue) ion and (white) dust tails.    Notable Images of Comet NEOWISE Submitted to APOD:  || July 13
|| July 12  || July 11  || July 10 & earlier ||","hdurl":"https://apod.nasa.gov/apod/image/2007/NeowiseStonehenge_Deval_5572.jpg",
"media_type":"image","service_version":"v1","title":"Comet NEOWISE over Stonehenge","url":"https://apod.nasa.gov/apod/image/2007/NeowiseStonehenge_Deval_960.jpg"}
We are going to decode the json string in our callback function :
displayApod(Response response){
    Map<String,dynamic> apoddetails=json.decode(response.body);


    setState(() {

      imageInfo=apoddetails['explanation']==null?"data is not available":apoddetails["explanation"];
      imageTitle=apoddetails['title']==null?"data is not available":apoddetails['title'];

    });
    mediaType=apoddetails['media_type'];
if(mediaType=="image"){  imageUrl=apoddetails['hdurl'];}
else {imageUrl=null;}

  }
The first line decodes the json string , we have only included imageInfo and imageTitle in the setState method because we want to display these two on the screen .
After that we have enquired about the media type . Why ? Because sometimes the api returns the media type as video and provides a url for that , in this basic tutorial ,
we are only interested in displaying images . We only initialize imageUrl if the media type is image. I don’t know about you but I like hd images that’s why
I have provided ”hdurl” , you can provide “url” , if you want a low resolution image .
Now override initState method and call the function getApodResponse,
  @override
 initState(){
    super.initState();
    dateTime=DateTime.now();
    year=dateTime.year.toString();
    month=dateTime.month.toString();
    day=dateTime.day.toString();
   getApodResponse(year:year,month:month,day:day).then((response) => displayApod(response)).catchError((error)=>print(error));
 }
We want to display today’s APOD image when app opens , so we have made a DateTime object , initialized year , month and date with the current year , month and day respectively and called the getApodResponse function with these as arguments . We also want to give users an option to choose whatever date they like . NASA gives an option to get the APOD of any day between June 16, 1995 ( the APOD launch date ) and today . We just need to display a date picker to do this . Following function will display a date picker when called:
Future<void> datePickerDialog(BuildContext context) async{

DateTime dateTime=await showDatePicker(context:context,initialDate: DateTime.now(),firstDate: DateTime(1995,6,16,0,0), lastDate: DateTime.now(),cancelText: "Cancel",confirmText: "OK");
    if(dateTime!=null){

      setState(() {
        year=dateTime.year.toString();
        month=dateTime.month.toString();
        day=dateTime.day.toString();

      });
      getApodResponse(year:year, month:month, day:day).then(displayApod).catchError((error)=>print(error));
    }
}
Carefully look the argument for firstDate , we have restricted the earliest allowed date to June 16,1995 . When user selects a date , we update the UI by calling setState and getApodResponse .
Now , your _ShowPicState class should look like this :
class _ShowPicState extends State<ShowPic>{
  String imageUrl;
  String imageInfo="Image Information";
  String imageTitle='Image Title';
  String mediaType ="mediaType";
  String year;
  String month;
  String day;
  DateTime dateTime;

  Future<void> datePickerDialog(BuildContext context) async{

DateTime dateTime=await showDatePicker(context:context,initialDate: DateTime.now(),firstDate: DateTime(1995,6,16,0,0), lastDate: DateTime.now(),cancelText: "Cancel",confirmText: "OK");
    if(dateTime!=null){

      setState(() {
        year=dateTime.year.toString();
        month=dateTime.month.toString();
        day=dateTime.day.toString();

      });
      getApodResponse(year:year, month:month, day:day).then(displayApod).catchError((error)=>print(error));
    }
}

  Future<Response> getApodResponse({String year ,String month , String day}){
    String date=year+"-"+month+"-"+day;
    String url =Uri.encodeFull("https://api.nasa.gov/planetary/apod?date=$date&hd=true&api_key=DEMO_KEY");
    Future <Response> response = get(url);
    return response;
 }

  displayApod(Response response){
    Map<String,dynamic> apoddetails=json.decode(response.body);

    setState(() {

      imageInfo=apoddetails['explanation']==null?"data is not available":apoddetails["explanation"];
      imageTitle=apoddetails['title']==null?"data is not available":apoddetails['title'];

    });
    mediaType=apoddetails['media_type'];
if(mediaType=="image"){  imageUrl=apoddetails['hdurl'];}
else {imageUrl=null;}
  }
  @override
  initState(){
    super.initState();
    dateTime=DateTime.now();
    year=dateTime.year.toString();
    month=dateTime.month.toString();
    day=dateTime.day.toString();
   getApodResponse(year:year,month:month,day:day).then((response) => displayApod(response)).catchError((error)=>print(error));
  }
  @override
  Widget build(BuildContext context) {

// TODO: implement build
  throw UnimplementedError();
  }
}
Finally , let’s display the image and other data on the screen ,
Clear everything present inside build function , return SafeArea and make Scaffold child of it :
@override
  Widget build(BuildContext context) {

return SafeArea(
        child : Scaffold(

          appBar: AppBar(
            title: Text("NASA APOD"),
   ),
),
);

}
Add body to Scaffold and pass Padding into it , make ListView child of Padding :
Scaffold(

          appBar: AppBar(
            title: Text("NASA APOD"),

       ),
body : Padding(
            padding:EdgeInsets.only(top:20,left:30,right:30),
            child:ListView(

            children: <Widget>[
              ]
   ),
 ),
),
We have given a padding of 20 px from the top and 30 px from left and right , the text and image will look better . The next thing is to display date chosen , title , image and explanation for the picture :
ListView(
             children: <Widget>[
                  GestureDetector(
                  child: Row(
                  children: <Widget>[
                  Container(
                    child: Text(day+"-"+month+"-"+year),
                    decoration: BoxDecoration(border: Border.all(color: Colors.red,width: 1.5)),
                  ),
                  Padding(padding: EdgeInsets.only(left: 10),),
                  Icon(Icons.calendar_today,color: Colors.red,)

                ],
              ),
               onTap: ()async=>await datePickerDialog(context),
             ),
               Text(imageTitle,
               style: TextStyle(
                 fontWeight: FontWeight.bold
               ),
               ),
              Padding(padding: EdgeInsets.only(bottom: 20),
              ),
              Container(

                child: imageUrl!=null?Image.network(imageUrl):mediaType=="video"?Text("image is not available"):Text("Waiting For the picture"),

          ),
                   Padding(padding: EdgeInsets.only(bottom: 20),
              ),

             Text(imageInfo,
            style: TextStyle(
                fontStyle: FontStyle.italic
            ),
           ),
            ],
          ),
We have given a padding of 20 px between title and image , and 20 px between image and information . We have used ListView to display all the data so that the user can scroll . The container which contains date and the calendar icon are children of Row which is the child of GestureDetector , when the user taps , we can show a date picker . The only tricky part is child argument of Container , it is simple actually : If the imagUrl is not null , it means we have successfully got the image’s url and we can display the image . If it is null then we check the media type , if it is video , we display : “image is not available” , if it’s not , then it means some error has occurred and we display “waiting for image”.
Now , it’s time to run the app , run the app in debug mode on the emulator/physical device .
There are few points worth noting :
1) The api call is done using Demo_Key . Using Demo_Key , you can make 50 requests per day and maximum 30 requests per hour.
2) The clean way to deserialize json is to build Strongly typed Dart classes . Also , we can use FutureBuilder to handle an api call and change the data on the UI . I avoided them because for a simple app like this , they would have been an overkill .
If you liked the tutorial , then please give it a star on github
Understand Basics
API :
It stands for Application Programming Interface and it means different in different contexts , but the most common meaning is an Internet address to which a programmer sends http requests to read or write data . Of course an API is not just that and there are a lot of things involved but for the sake of simplicity , I am not touching any other concepts . Communication with an API is done using http methods , the most common are :
GET : for reading records , DELETE : for deleting records , POST : for inserting new records , PUT : for replacing existing records , PATCH : for updating existing records.
Future : Before you understand Future , you should know that certain operations are slow compared to the CPU , like reading a file or writing data to a file , communicating to an API using http requests etc.
We can’t keep waiting for these slow operations to complete otherwise it would waste the CPU’s precious time and block other commands . In Flutter , the slow task is started as normal and then moved away from the main thread , a listener is created , this listener monitors the slow task and raises an alert when it finishes waiting , the reference to the listener is returned to the main thread and is known as Future . Don’t worry if all this sounds hard , it is very easy to handle a Future in flutter , there are two ways to do it :
Using .then() :
Let’s assume you have this function which reads from a file and returns a String ,
Future<String>  readFile()
{
 //logic
}
The function has a return type Future<String> , it means we can’t access the String returned by the function like this :
String str= readFile();
Because it is slow and can take a lot of time to complete , instead we have to provide a callback function which is called when the readFile() function finally completes .
void callbackFun(String str)
{
//use the expected String that will be returned by readFile()

}
Note that the parameter is of type String , the parameter of a callback function must match with type of Future returned . The readFile() function should be called like this :
readFile.then(callbackFun).onError((error){

//handle error

});
If readFile fails with an error , you should be able to handle the error . onError would do that .
Using async , await :
The other more straightforward way is to mark the function as async ,
Future<String>  readFile() async
{
//logic
}
Now you can get the String by using await keyword,
String str = await readFile();
Awaiting can pause the running code , until the Future is resolved , before moving to the next line .
If you are calling readFile inside another function, say upperFun , then make it async as well,
Future<type> upperFun() async
{
String str=await readFile();
}
It is worth noting that build functions can’t be marked as async but events like onPress can , so solve the async - await - async thing there .
JSON :
It stands for JavaScript Object Notation and is used for exchanging data from client to server and vice - versa . A json string contains key - value pairs like this :
“{

“Name”: “xyz”
 “uid  ” : 1234
 “ country_code” : “IN”
}”
First you have to decode this json string to Dart data types , a very simple way to do this is to use json.decode which is present in the library dart:convert , for this example , you can do like this :
Map<String,dynamic> person_info = json.decode(“json_string”);
To access name , write this :
person_info[“Name”];